Git allows us to have version control for our code on our local machines, but what if we want to share this code with others or work on a team. GitHub is an online tool that allows you to share and manage code as well as provide an online backup should something happen to your local computer.
Introduction to GitHub
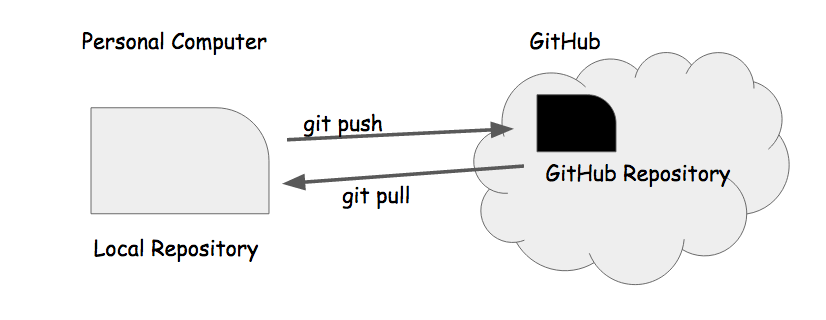
GitHub provides an online hosting service for your code. You store your projects on GitHub using Git repositories. These repositories are an online copy of your local Git repository and provide online backup for your code.
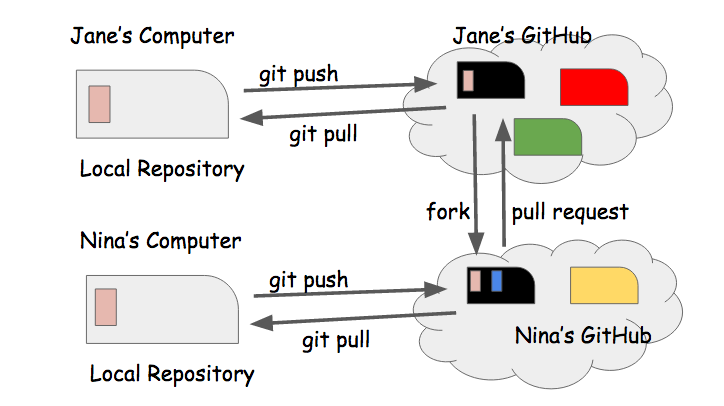
You can use GitHub to work with teams because multiple people can copy the GitHub repository to their own local repository (called cloning) or to their own GitHub account (called forking).
GitHub implements version control and conversation when working with teams using the Git tools of commits, branching and merging as well as additional tools of pull requests to request a merge and issues for online conversations about the project.
When working with GitHub, you will establish a GitHub workflow that incorporates your local Git workflow. The next sections describe the process of working with a common GitHub workflow. Each step has a set of commands to perform on GitHub or run in the Command Line.
- Either Fork and existing repository or Create a new one.
- Once you have a repository on GitHub, Clone it to your local computer to make changes.
Updates are done on your local repository and then the remote repository is updated. You will repeat this cycle many times as you add features to your project.
- Verify your master branch is in sync with the remote repository by Pulling updates before making changes.
- Make changes locally using Git workflow.
- After making changes, Push your feature-branch to GitHub.
- Submit a Pull Request to merge your feature branch back into the master branch.
- Once your pull request is Merged repeat this cycle to make additional changes.
- Creating a Repository: As a developer, you always want to have a backup of your code, as well as being able to access it from anywhere and easily share it with others. When you start a new coding project you should also create a GitHub repository for this backup. There are two main ways to do this:
- If you're starting a new project, you can create the repository on GitHub and then clone it to your computer before you start.
- If you have existing code project you want to store on GitHub, you can push this to a blank repository on GitHub
- Forking an Existing Repository: Forking is a way to share code using GitHub. When you fork a repository, you make a copy of that repository on your GitHub account. You can fork any repository on GitHub that is public. Many developers and open source projects make their code public on GitHub so they can share it with other developers. The steps are:
- Navigate to the repository on the other account
- Choose the fork option
- Select which of your accounts you want to fork into (if you have more than one)
- View the forked repository on your own account (you should be redirected there automatically when GitHub finishes forking)
- Cloning a Repository:
Cloning is the process of copying a repository from GitHub to your personal computer. When you clone a repository, a new folder is created on your computer with the repository name, and all of the files inside the repository are copied into this folder. The steps to clone are:
- Navigate online to the GitHub repository you want to clone and copy its url. (If you are using SSH Keys, select SSH before copying - otherwise select HTTPS)
- On your local computer use the Command Line to navigate to the directory you wish to clone the GitHub repository into. Verify that this directory is NOT already a Git repository by typing
ls -la
and verifying there is no .git folder. You NEVER want to clone a repository into another local Git repository - Clone the repository.
git clone COPIED-URL
If you are using HTTPS, you will be prompted to enter your GitHub username and password. (You won't be able to see what you type just press enter when you finish each) - Cloning creates a new folder with the same name as the repository on GitHub. Navigate into this folder.
ls
cd FOLDER-NAME
- The folder you have created is a Git repository and the cloning process has set up a remote to link it back to the repository you cloned from on GitHub. A remote contains the location information for the repository on GitHub. You can verify this by using the Git command to view a remote
git remote -v
.
- Updating a Repository: Once you have cloned a repository to your computer, you can edit the files and folders. The repository is a Git repository, so you should use Git workflow to protect your work as you make changes.
Before you make changes locally pull a current version of the remote master into your local master to make sure you have the latest version of the project.
git checkout master
git pull origin master
Once you have made changes, you will want to push these changes back to GitHub so your remote and local files are in sync. The push command in Git uses a remote to send the code in a branch to the linked repository on GitHub.
git push origin FEATURE-BRANCH-NAME
The template for the push command is:
git push REMOTE-NAME BRANCH-NAME
REMOTE NAME = name of remote or defaults to origin.
BRANCH NAME =  name of branch you want to push or defaults to the current branch..
Thus, the push command can be called without a remote or origin.it push
But this can result in accidentally pushing the wrong branch (like master), so always add the remote and the branch. - Pull Requests : A pull request is a operation made on GitHub which requests to merge code from a feature branch into the master branch. Its like a friendly way of saying: "Hey! I'm done implementing this feature your asked for, can you review my code?" After a pull request is made, it needs to be merged to update the master branch on GitHub. When working in a team, it is best practice to have at least one other person review your pull request and they should be the person to merge it once the changes are approved.
The steps to create a pull request are:
- Push a feature branch to GitHub
- Navigate to the GitHub repository online and either choose the Compare and Pull Request option if it is available or the Create New Pull Request option
- Verify the base branch you are requesting to merge code into (master) and the branch you are merging code from (feature-branch).
- Fill in the title and description of your pull request
- Choose the Create Pull Request option
- Wait for your pull request to be merged according to your team GitHub policy.
- Merge Pull Request : If you are using GitHub for your own project without a team you can still create a pull request and then merge your own pull request. You would usually NOT merge your own pull request unless you are working solo on a project.
The steps to merge a pull request are:
- Select the Merge Pull Request option
- Select the Confirm Merge option
- Verify your changes have been merged into the base branch (master)
- Delete your feature branch to keep things cleaned up (optional).
Watch it Live
The video shows how all these commands work on an actual project.
Your Turn
Let's practice all of this by working on an existing GitHub repository.
Part 1: Clone an existing repository to your computer.
- Navigate to the Travel repository in a browser.
- Fork the repository to your personal GitHub account using the Fork button.
- Navigate back to your personal GitHub account and explore your new repository online. You can open folders, read code, look at commit messages and more. Now that you have forked the repository, a complete copy is now in your personal GitHub account and any changes you make locally will only be pushed to this copy.
- Clone your copy of the course materials from your personal GitHub repository to your computer following Clone A Repository Steps
- This will create a folder on your local computer. Navigate in this folder and verify the same files are here as are on your GitHub repository.
Part 2: Update the "summer_destinations.txt" file using Git workflow and upload your changes to your repository on GitHub. Here are the detailed steps:
- Navigate to the folder on your computer.
- Create and checkout a new feature branch
git checkout FEATURE-BRANCH-NAME
- Add some of your favorite travel destinations to the summer_destinations.txt file.
- Add your files to the staged Git files and commit your changes
git add .
git commit -m "your commit message"
- Push your feature branch to GitHub
git push origin FEATURE-BRANCH-NAME. - Submit a pull request on GitHub from your feature branch to your master branch.
- Wait for your feature branch to be merged
Step 3: For this step you will put on your manager hat (it's purple) and merge the pull request the other (non-manager) you just submitted to simulate working on a team.
- View the pull request on GitHub. Look at the commit messages and files changed and verify you want to merge this code into the master code.
- Merge your pull request on GitHub so the changes are on your master branch
- Navigate to the updated file on GitHub and verify your changes are there.
- Delete the feature branch on GitHub if that is part of your GitHub workflow.
Review
In this challenge you learned the basics of working with Git. You should be comfortable with the following concepts and how to implement them in code:
- Create a repository on GitHub
- Fork an existing GitHub repository to your personal GitHub account
- Clone a GitHub repository to your local computer
- Update a GitHub repository by pushing changes from your local computer
- Submit a pull request for your changes to be merged into the existing project
- Verify a pull request is valid and merge it into a GitHub repository
If you would like to learn more we recommend working through the GitHub tutorials