As a web developer, you will write a lot of code. Sometimes you will want to see your previous code, or revert to a previous version. Version control is a tool that allows you to track progress, review and revert changes and create backups in your code. There are several version control tools available but one of the more common ones is called Git.
Understanding Git
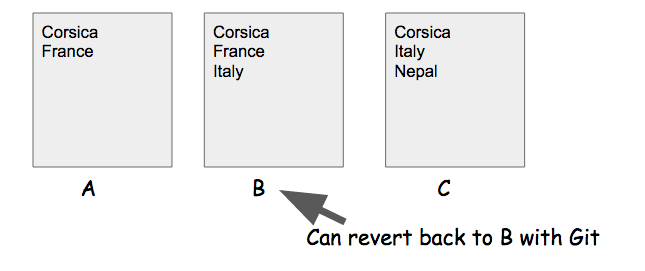
Using Git for version control we create save points as we work on a project. Each new feature should be saved so that at any time we can revert back to a previous save point. In the diagram below, the features are saved at point B and modified and saved again at point C. If later in the project I want to revert back to point B I can do so easily using Git.
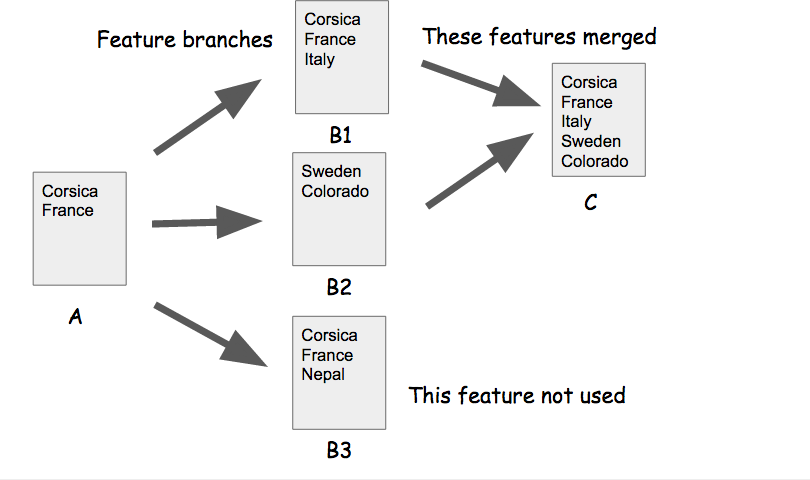
Git also provides branches where we can work independently from the main project on a particular feature. We can then choose to merge a branch into the main project or not. This provides a simple way to build your project in an iterative and flexible way. In the diagram below we have three branches from the main project B1, B2, and B3. At save point C, branches B1 and B2 are merged back into the main project and branch B3 is ignored. It can be deleted or kept for possible future integration.
The Git Process
When working in Git you will be following a basic workflow to create save points and branches to protect your work. Here is a common workflow followed by the details of how to implement each step.
- Create or navigate to a repository
- Verify your master branch is updated.
- Create and checkout a feature branch.
- Make changes on the feature branch and repeatedly make save points by:
- editing files or folders,
- adding files and folders to staging
- committing the save point.
- When finished updating merge the master into the feature first and resolve any merge conflicts if necessary.
- Update your master branch if not working on GitHub
- Checkout the master branch
- Merge the feature branch into the master branch so it has the latest working code
- Repeat with a new feature branch for the next feature
- Creating A Repository: To create a Git repository, navigate into the folder containing your project in the terminal and type the command
git init
This will create a .git folder inside your project folder to store all of your commits. Verify that this folder exists by typing the commandls -la
which lists all files and folders. - Repository Status: The status of a branch in a Git repository tells us if changes have been made to the state of files or folders in the project. Files and folders have three states they can be in:
- Untracked: A new file that is not yet being tracked.
- Modified: A file that is tracked and has been modified since the last commit.
- Staged: Files that are ready to be committed.
If you haven't made any changes your status will be clean. After you make changes, the files that have been changed will be listed.
git status
- Add Files for Staging : To make a save point, first add files for staging, either one at a time
git add myfile.md
or with multiple files in the same commandgit add file-1.md file-2.md
or all changed filesgit add .
- Commit Changes: Commit all the staged files to complete the save point. When you commit a set of files and folders you are making a save point for the project. The commit message describes this save point for future reference.
git commit -m "Initial commit"
A good commit message is detailed and states what was changed since the last commit. Some examples of good commit messages are:- "Create user profile"
- "Add form field for user's age"
- "Add cute kitten pictures to header"
- Creating A Branch: A branch represents an independent line of development in your project. We use branches to create a copy of the current repository and work on a small feature in this copy. Once the feature is complete we will merge it back into the original project. If the feature doesn't end up being needed you don't have to merge it back into the project. This allows the project to always be protected and in a working state while creating a new feature.
By default, all repositories have a master branch.
List your current branches.
git branch
Checkout an existing branch.
git checkout old-branch
Create and checkout a new branch for each new feature. Branch names should be lower case and one word (or hyphenated). They generally represent the feature you are creating (like add-forms)
git checkout -b add-forms
- Merge master branch into feature: When you have finished with a feature, you want to integrate all the existing code into it. Verify you are on the feature branch and all files have been committed there before you merge. Merging may cause a merge conflict if master has changed since you started your feature. If so you need to resolve it before finishing the merge.
git status
git merge master
When you merge, an editor window may open asking you to provide a merge message. Do so and CLOSE the editor window to complete the merge.
- Merge feature branch back into master: We also want our master branch to be up to date with current changes. We do this by checking out master and merging the feature branch back into it. This should rarely cause a merge conflict is you have just completed the previous step. If you are working on GitHub, you will skip this step and replace it with pulling down the latest changes to master from GitHub.
git checkout master
git merge feature-branch-name
- Merge Conflicts : Sometimes there is a conflict and the code in the two branches cannot be merged because the two branches both changed the same part of the file. In this case, Git can't figure out which change to keep so it creates a merge conflict. To fix a merge conflict, you will need to manually edit the file with the conflict and then re-add it to the staged files and commit the changes again.
- Using Git Commands : These are the more common Git commands you will use in a standard workflow. You can also
see a list of all Git commands in your terminal with the command
git help
or learn more about a particular commandgit help COMMAND-NAME
Watch it live
The video shows how all these commands work on an actual project.
Your Turn
Practice working with commits and branches by completing the following challenge.- Step 1: Setup
- Open your terminal and create a new folder called travel_app. Make sure this new folder is not inside of an existing Git repository as this does not work well.
- Create a text file called travel_feature_request.txt and add a header for Jane and Enrico's features.
- Initialize your folder as a Git repository and add this file to your initial commit.
git init
git add travel_feature_request.txt
git commit -m "initial commit"
Verify that you have committed the file by typinggit status
You should get a "directory clean" message.
- Step 2: Gather Features
- Create a branch for Jane's features
git checkout -b jane-features
- Open the travel_feature_request.txt file and add in 5 features for Jane.
- Add and commit these changes.
git add .
git commit -m "Add features from Jane"
- Checkout the master branch and then create a new branch for Enrico's features.
git checkout master
git checkout -b enrico-features
- Open the travel_feature_request.txt file. You should not see any of Jane's features in this file since you created the branch from master. Add Enrico's features.
- Add and commit these changes.
- Create a branch for Jane's features
- Step 3: Merge Features
-
- Checkout the master branch and merge Jane's features.
git checkout master
git merge jane-feature
- Verify the merge is committed and the status is 'clean'
git status
- Merge Enrico's features into the master branch.
- Depending on how you setup the text in your file, you may get a merge conflict. If so open the travel_feature_request.txt file, remove the merge indicator lines and choose the content you want to keep.
Features:
<<<<<<< HEAD
mobile check in
free luggage
ice cream in every country
=======
instagram recommendations
rental cars
camping
>>>>>>> enrico-features
After editing :Features: mobile check in free luggage ice cream in every country instagram recommendations rental cars camping
- Add and commit your changes and verify that the status of the master branch is 'clean'
- Checkout the master branch and merge Jane's features.
Your master branch should now have a single file with all of the feature requests from Enrico and Jane. Nice work. You have successfully used Git to create save points, build on feature branches and merge branches back together.
Review
In this challenge you learned the basics of working with Git. You should be comfortable with the following concepts and how to implement them in code:
- Create a Git repository
- Add files to staging in a Git repository
- Commit files to the Git repository creating a save point that can be accessed later
- Create a feature branch to work independent from the main project
- Merge branches together
This is only the beginning of what you can do with Git. Once you have mastered these basics we recommend you explore more on the Git Tutorial or the Becoming a git guru tutorial by Atlassian.